February 26' Bookbinding Work in Review
- Mar 12
- 11 min read
Earlier this month Prototype #4's failure started a bottom-up review of my entire process. To set the stage, we'll be walking together through my motivation for starting this artistic work, all the way up to what I now consider my finest piece to date, Prototype #6. There's a lot to go over so let's get started, reader.
Prototype of What Exactly?
Straight to the point, I like your style reader. In September 2025, very nearly six months ago, I started learning to bookbind on my own. My motivation was simple: to make what I couldn't find; an A5 size, soft leather journal with black paper.
Naturally, every material in the book I dreamt of was carefully curated, high quality, built to withstand use over time, and looks beautiful doing it. Beauty, in this case, is not for it's own sake but rather a biproduct of intent and function. I saw myself using it for my atristic endeavours. Something elegant, creative, professional, unique. Just for me.
To the point of my intent, I learned later what archival means in bookbinding in terms of quality and process, and equally important, what it doesn't mean. You see, in cases like these, I go straight to two sources; those responsible for maintainence and repair (archivists), and artists. Both share the same goal: longevity.
Disclaimer: I am not stating that the journal I'm describing doesn't exist, but rather, what is available doesn't meet the quality I imagine for this project.
In short, the Prototype is my own dream journal.
Tools that Solved Problems (and one that didn't)

The failure of Prototype #4 (P4) came at the perfect time. It provided the data I needed to get back to the workbench and review my original intent against the work I've done up to this point. Now I'll discuss, in order of importance, the solutions I persued and how P5 nearly hit the mark.
Hole Alignment and Tolerances
This was the catastrophic failure point in P4 so addressing it first was critical. It took some time to find a pricking iron with 6, 1 mm punches. To add some complexity, I didn't want to increase the binding width any more than absolutely necessary from the previous Prototypes. In conclusion, the main goal is two-fold: increase punch uniformity, decrease structural damage completely.
The tool I needed ultimately came from Amazon, manufactured by a company called WUTA. This particular set came with a two and six prong punch and at a price I could tolerate for practice. Excelsior. Although, as I would later discover, not without a bit of finagling. More on that later.
(Also see: Important note for the reader at the bottom of this post for how I use Links and my position on Affiliate Marketing.)
Cut Uniformity & Blade Flex
At the beginning of my bookbinding adventure, I purchased the Olfa 9mm blade, which performed well with lighter weight leathers. P4 is substantially different coming in at a 5 ounce, 2mm thickness.
The problem was clear; the Olfa was too light and flexible for heavier leathers. The answer here was simple so I purchased a Workpro Box Cutter with my order. But, exactly like the WUTA punch, there was another lesson to learn here which I'll discuss later.
Thicker Leather & Increased Fold Resistance
This section is a wonderful example of the best-laid plans of mice and men often go awry. Reader, if like the me of the past, you've never heard of Skiving, allow me, or rather Wikipedia, to enlighten:
Wikipedia defines Skiving (leathercraft) as "the process used in leather crafting to reduce the thickness of leather, especially in areas that are to be bent or folded and which must be pliable without becoming weakened. It is usually performed on the "flesh" side of a piece of leather rather than the "finished" (hair) side. Skiving is also used when two edges of leather are to be joined, so as to keep the overlapping area from becoming unnecessarily bulky. The technique is useful for joining long strips of leather together to form belts or watchbands."
My reasoning at the time was to forgo use of a V-gouger. I concluded that gaining flexability at the hinges at the cost of durability wasn't the right methodology for this project. Instead, I considered skiving to lighten the hinges, thereby decreasing fold resistance.
I didn't understand at the time what an undertaking this would be if inacted, especially by my inexperienced hands. More on that later. I commited to the Kiridashi knife by KAKURI. Knowing it would need sharpening, I also purchased the SHARPAL 204N Leather Strop to keep the edge in tip top shape.
Rounding Out the Tools Section
As a matter of finish and refinement an honorable mention goes to the 0.7mm Leather Edge Beveler by DIUDUS I picked up. Here again, a solid entry level tool for an agreeable price. Now that we've discussed the three main issues as listed in the above subheadings and the correlating tools that solve them, we're set to consider the results of Prototype #5.
Prototype #5 Results & Further Refinements
First, reader, allow me to describe what's on our workbench for this project, and for good measure, I'll include the dimensions of the prototype.
Tools
Olfa 9mm blade (I hadn't addressed the issue with blade flex yet.)
Bookbinders Awl, 1mm (a new process is born from this tool, more later)
Materials
Prototype Dimensions
Leather Cover: Height: 242 mm | Width: 342 mm | Binding Width: 24 mm
Text Block: 9" x 12", pre-fold
With the scene on our workbench set, I'll walk us through what was done in order of occurence.
Prework Decisions
Since P4 never made it to assembly, we have our signatures prepared and ready for sewing. These sigs were punched with a 1 mm bookbinders awl which is noteworthy. With each piece I've made using an awl, a sort of mushrooming effect occurs on the opposing side. Whether it's awling holes 1 sheet at a time or 8 mushrooming occurs. This is a problem I aimed to address with P6. For now, let's press on.
With our signatures already prepared, the first order of business is to measure and cut the leather material for the cover. With every prototype up to this point I've arduously made a template from chipboard first. The advantage of this, on one hand, was far less wasted leather from inaccurate cutting. Ironically, if I under or overestimate the measurements, say taking into account thicker leather I've not used before, I also waste leather. I decided to focus on the measurments and materials at hand without first making a template. This decision was the right one.
In review:
address mushrooming with P6 (Or so I thought), use prepared signatures.
forego templating until a solid design presents itself.


As I now write, I hold the completed P5 in my hands as well as a smattering of notes for just this occasion. For brevity, I'll bulletpoint in a causal format using bulletpoints. This is also where I will tie in some previously mentioned points I would get to later. Here we are, reader:
Cutting the Cover Material: Using the Olfa blade created a wavyness in spots where I readjusted hand position or pressure. This became more pronounced with the 2mm leather thickness. The utility blade is too thin.
Punching with the 6 prong WUTA: This is an interesting result. The mechining of the tool itself is slightly flawed in two ways. This caused a jumping to occur when applying force with the hammer. Each individual punch is removeable, secured only by a small set screw. This design creates two functional weak points:
each punch insert must be machined to the exact same dimensions.
each prong's hole and seat must be machined to the exact same standards on both X and Y axes.
They were not. Fortunately, the tool comes with some punch replacements, of which I chose the 6 that most closely matched, reducing the height differences to near uniformity. This would make the 6 prong punch more stable with Prototype 6's creation. I could not address the fraction of a degree off kilter each hole equally shared. My conclusion is that the tool itself was not centered precisely at the time of drilling.
Sewing the Signatures: The punch uniformity no longer being an issue with the leather cover, the hand-awled holes in the signatures made sewing as difficult as ever. Additonally, the mushrooming effect increased the difficulty several fold.
Additional Learning and Conclusion
Where P4 failed, P5 succeeded but just barely. The 6 prong punch issue made 4 out of 5 stations a degree or so off axis. This didn't help sewing the signatures any easier let me tell you. I also needed to design a better way of punching the holes in the signatures to increase uniformity, not to mention solve the mushrooming issue and thereby ease thread tension. The awl no longer helps, it hinders inside the tight tolerances of my design.
Those points are further evidenced by a wildly missthreaded station at the head of P5. But between you and I reader, we'll just say it's a happy little mistake.
Prototype #6: My Finest Work to Date
With the well documented learnings from P5 in hand, I set about finalizing my plans for it's successor. First up? Address that damned signature issue once and for all.
Signature Punch Template (SPT), February 20, 2026:
Reader, if I've learned anything over the course of my artistic life it's that conceptual-stage complexity destroys more ideas than it nurtures. My remedy has been to distill whatever the idea is down to it's simplest function, take stock of materials on hand, reassess, choose a course. Repeat if necessary until function and material meet.
The SPT's function is, by all intents, simple: provide signature hole guides that precisely indicate where each of 5 holes should be made in the center crease, which implies that the template finds center. Once I halve the 18x12 parent sheets to 9x12, the template should fit perfectly atop 4 sheets. Use binders clips to ensure center axis. Punch. Profit.
Using a leather punch for this application instead of an awl eliminates another problematic manifestation; mushrooming. All that material has to go somewhere, which ultimately increases needle hangups and thread friction exactly where I don't want it. Ultimately this makes the whole sewing phase a downright unpleasurable experience in every way. By using a leather punch we remove the excess material outright. Increasing the size of the hole to 2 mm gives me greater tolerance for threading the needle. Mint.
Template Making in Stages

SPT #0 is our starting point. Not intended to be accurate but merely a proof of concept. If I can assume that my RotaTrim20 cuts each sheet consistantly down the middle, which I can now, I should be able to make a rough experimental template.
With quick measurments and cutting, SPT #0 comes to life. Results? The bottom edge was cut too lean on the right side resulting in the center binding line being off a degree. I used some painters tape to raise it and hark! That'll do. Now to make one without the handyman's bandaid.
SPT #1 was a learning lesson on how I utilize the tools I've acquired. In many if not most cases, I'm honing my skill on when and how a tool is used. I assumed I could use my square on what I also assumed was an industrially machined edge on the chip board. Turns out many of the problems I've been experiencing may be contributed to those assumptions, one or both at the same time. This template, like it's predecessor, was inaccurate and unusable without a bandaid.
Thanks to an experienced seamstress who advised me to find my center point first, then measure out to where my edges should be, SPT #2 dove head first into success. This meant I didn't use the premade edges to square and opted for making my own. This worked. On further inspection I found inaccuracies throughout the bulk of my chipboard stock.
The lesson? The long way is the short way.
Material Preparation and Execution, Prototype #6

With the success of SPT #2, and the adjustments to the WUTA 6 prong punch, I reasoned that the catastrophic failures of P4, and the hinderances of P5 had their best chances yet for resolution.
First, I pull 24 sheets of my 18x12 paper stock, trim the 18 long side in half creating 48 sheets. I arrange the paper in stacks of 8 (1 signature = 8 sheets).
Second, for my first use of the Signature Punching Template (SPT), I restrain sheet quantity to 4, or half a signature. Setting the sheets under the SPT, securing with binder clips, and punching with the 2 mm leather punch is a bit more time consuming, however, it's abundantly clear this method produces reproducable accuracy.

Third, I revisited my dimensions for the leather cover.
Height: 240 mm (a 2 mm reduction from P5)
Width: 342 mm
Binding Width: 24 mm
With that done, and the recent learning acquired from the SPT, I grabbed my new Workpro Boxcutter, insterted a new blade and went to town. Hmm, this blade is new but it doesn't feel right.
Fourth, I mark center on the flesh side, draw my binding widths and plot the 5 station positions ever mindful of accurate axes. Punch, and done. The adjustments to the WUTA worked.

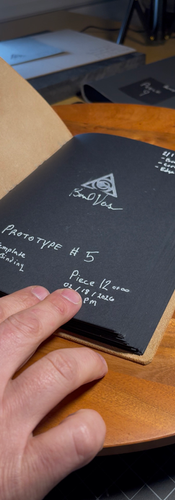
Fifth, right to sewing and Hark! In approximately 90 minutes Prototype #6, Piece 13 of n was fully bound and ready for my makeshift bookpress.
This was the cleanest, most accurate sewing session to date. I dare say a few more like this and I might be able to complete 2-3 in a day, prep-work not withstanding. Delightful.
What I won't go over at this time is detail work on the P6's leather cover, edge beveling, sanding, smoothing and sealing.

An Additional Point, and Additional gratitude
As I learn, along the way I meet people, experts, specialists, artists and hobbyists alike. Like the seamstress previously mentioned, one such individual imparted some knowledge specifically in the realm of leatherwork. To jenmonade, I thank you.
Up to this point, my wealth of research was wrong on four points in practice and they are as follow:
Cut thick leather in iterations. Wrong. This may work well for trimming the text block edge as a finishing move, but I was informed it's best to cut leather in one decisive cut. This ensures uniformity. And, do so from the top-side.
Punch flesh-side to top-side. Wrong again. The reasoning I saw over and over again was that this method ensured a well cut hole where you see it most. However, a mushrooming effect was occuring on the top side. I assumed that the punch I used was dull. Perhaps, in part, but not wholley the correct conlcusion of the evidence. Instead, I was directed to punch top-to-flesh.
Stock razor blades are sharp. Nope. Oof, this is a big one. Earlier I noted that the new razor blade felt resistant on the leather, in essence, I could hear the cutting. This also created visible marking on the leather. The cure? Take those new blades to the strop. This is also where I was taught, step by step, how to use the strop properly.
Skiving to reduce hinge force. Let's try something else first. No matter what way I utilize, it seems that a reduction of structural integrity is destined to occur. However, jenmonade recommended an option I was unfamiliar with: wet forming. I'd like to try this on the next Prototype in place of skiving, v-gouging, or u-gouging. I have yet another, more experimental idea that may come first.
All of these adjustments in execution will be implemented in March '26 on Prototype #7 Piece 14 of n.


February '26 in Conclusion
What can I say that hasn't already been said here at length. The month of February has been the most challenging since I started learning the skill in September '25. From the complete systemic failure of P4, the recovery in P5, and the hands down finest work I've executed to date in P6.
Admittedly, I'm making progress, and meeting colleagues willing to share their hard earned experiences along the way has increased my efficacy. I'm left, however, with a nagging question I've yet to answer: What's the story worth telling here?
As I complete this post my mind turns to another. Reader, the end of March will have been 6 months I've devoted myself to learning bookbinding; a skill steeped in historical relevance. At it's core thrums the human heart and with it our deepest aspirations.
When I began, my goal was to make for myself. Now I wonder if there's yet more to glean from this experience, from my own humanity, and my relationship with artistry.
Until next time, take care of yourself dear reader, for me. And I will take care of myself for you.
Important note for the reader:
I include links to materials, tools, and related resources where they support clarity, verification, or reproducibility. I do not engage in affiliate marketing and have no intention of doing so. These links support open information sharing. You may follow them freely and confidently, knowing that no financial incentive or tracking mechanism influences their inclusion.

